How to Receive and Process WhatsApp Messages via Webhook
Chatmaid webhooks give you a reliable, signed, retrying delivery system for incoming WhatsApp messages. Combined with the send API, they're the complete infrastructure for any bidirectional WhatsApp integration — without managing your own WebSocket connection or WhatsApp session. Start building: developers.chatmaid.net/signup Documentation: developers.chatmaid.net/docs/webhooks
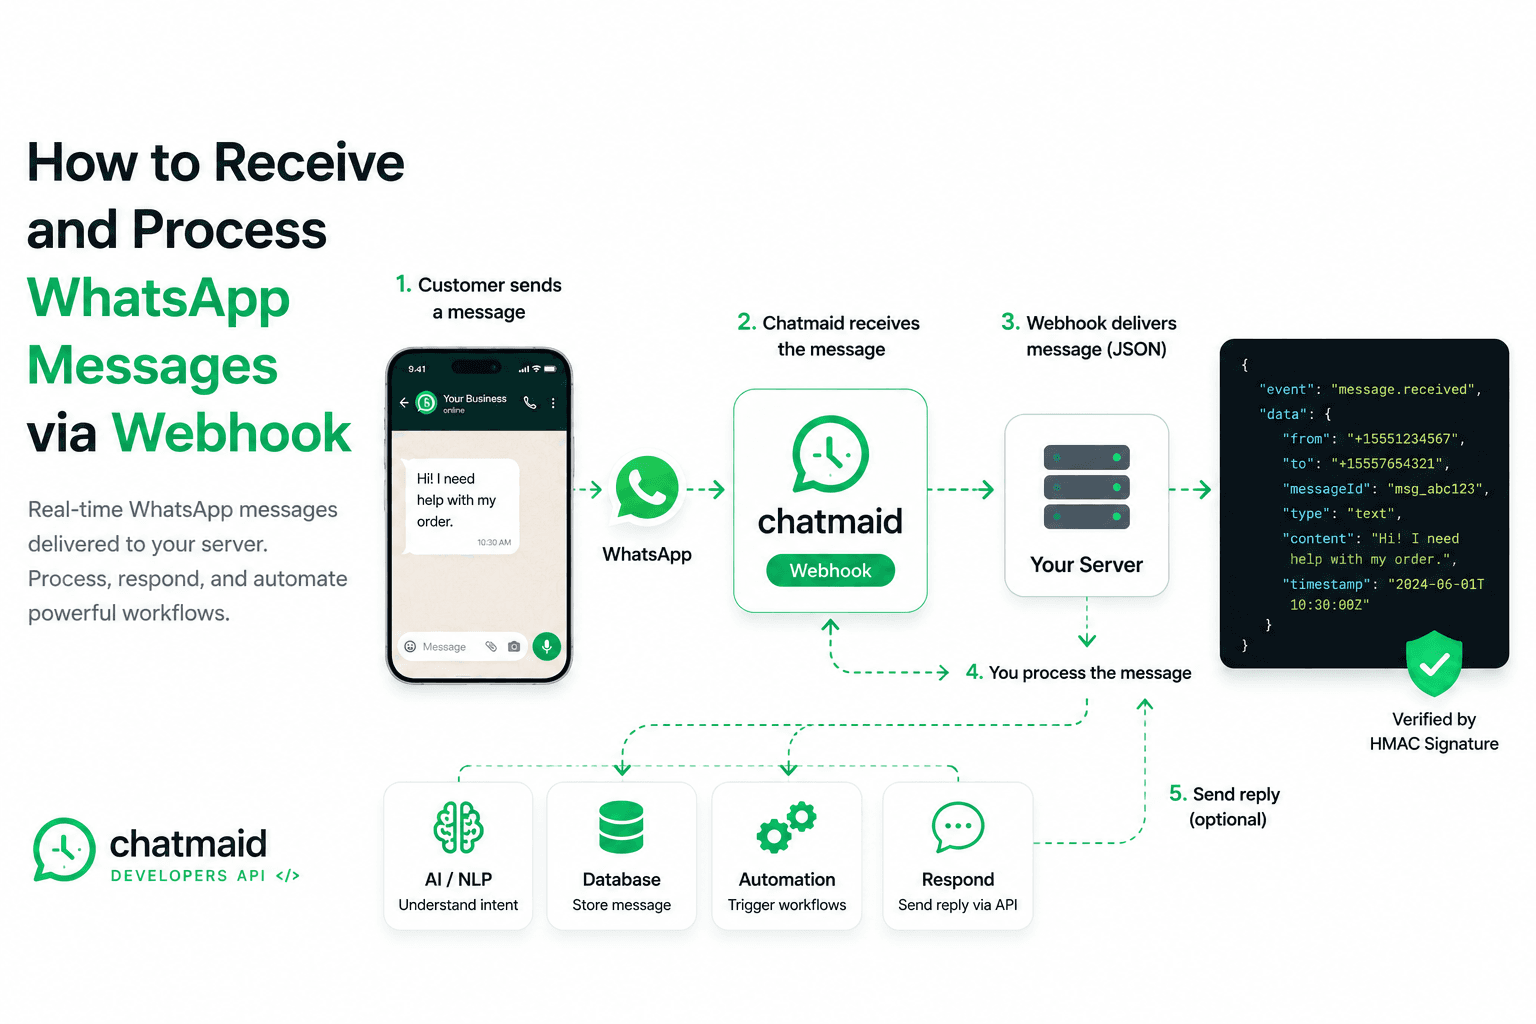
Sending WhatsApp messages programmatically is straightforward. The interesting half of the problem — receiving and processing messages in real time — is where most developers get stuck.
Chatmaid solves this with signed webhooks. When a message arrives on your connected WhatsApp number, Chatmaid immediately fires an HTTP POST to your endpoint with the message content, sender details, and timestamp. Your backend processes it and can reply in under a second.
This guide covers everything: webhook setup, payload structure, signature verification, and code examples for the most common use cases.
How Chatmaid Webhooks Work
Chatmaid fires webhooks for the following events:
Event
Description
message.received
A message arrived on your connected number
message.sent
A message you sent was accepted by WhatsApp
message.delivered
A message reached the recipient's device
message.read
The recipient opened the message
message.failed
Delivery failed (with reason)
For building chatbots and service agents, message.received is the one you care about most.
Setting Up Your Webhook
Step 1: Create a public endpoint
Your webhook URL must be publicly accessible over HTTPS. For local development, use ngrok or Cloudflare Tunnel to expose your local server.
bash
ngrok http 3000 # Forwarding: https://abc123.ngrok.io → http://localhost:3000
Your webhook URL would be: https://abc123.ngrok.io/webhook/whatsapp
Step 2: Register the URL in Chatmaid
In your Chatmaid dashboard:
- Go to Webhooks
- Click Add Webhook
- Paste your URL
- Select the events you want to subscribe to (start with
message.received) - Copy the webhook secret shown — you'll need this to verify payloads
Step 3: Build the endpoint
Here's a minimal webhook handler in Node.js (Express):
javascript
const express = require('express'); const crypto = require('crypto'); const app = express(); app.use(express.json()); const WEBHOOK_SECRET = process.env.CHATMAID_WEBHOOK_SECRET; app.post('/webhook/whatsapp', (req, res) => { // Verify signature const signature = req.headers['x-chatmaid-signature']; const payload = JSON.stringify(req.body); const expected = 'sha256=' + crypto .createHmac('sha256', WEBHOOK_SECRET) .update(payload) .digest('hex'); if (signature !== expected) { return res.status(401).json({ error: 'Invalid signature' }); } // Acknowledge immediately (Chatmaid retries if you don't respond within 5s) res.status(200).json({ received: true }); // Process asynchronously processMessage(req.body).catch(console.error); }); async function processMessage(payload) { if (payload.event !== 'message.received') return; const { from, content, timestamp } = payload.data; console.log(`Message from ${from}: ${content}`); // Your logic here: AI response, database lookup, escalation, etc. } app.listen(3000);
The Webhook Payload
A message.received event payload looks like this:
json
{ "event": "message.received", "webhookId": "wh_abc123", "timestamp": "2026-06-01T14:32:00Z", "data": { "messageId": "msg_xyz789", "from": "+50761234567", "to": "+15551234567", "content": "Hello, I'd like to check my order status", "type": "text", "timestamp": "2026-06-01T14:32:00Z" } }
For media messages (images, audio, documents), the type field changes and a mediaUrl field appears:
json
{ "event": "message.received", "data": { "messageId": "msg_xyz790", "from": "+50761234567", "to": "+15551234567", "content": "Here is the receipt", "type": "image", "mediaUrl": "https://media.chatmaid.net/msg_xyz790.jpg", "timestamp": "2026-06-01T14:33:00Z" } }
Signature Verification
All Chatmaid webhooks include an X-Chatmaid-Signature header with an HMAC-SHA256 signature of the request body, using your webhook secret as the key.
Always verify this signature before processing the payload. Without it, anyone who knows your webhook URL can send fake events.
Python example:
python
import hmac import hashlib from flask import Flask, request, jsonify app = Flask(__name__) WEBHOOK_SECRET = "your_webhook_secret" @app.route('/webhook/whatsapp', methods=['POST']) def webhook(): signature = request.headers.get('X-Chatmaid-Signature', '') payload = request.get_data() expected = 'sha256=' + hmac.new( WEBHOOK_SECRET.encode(), payload, hashlib.sha256 ).hexdigest() if not hmac.compare_digest(signature, expected): return jsonify({'error': 'Invalid signature'}), 401 # Respond immediately data = request.json # Process asynchronously (use Celery, asyncio, or a thread) process_message_async(data) return jsonify({'received': True}), 200
Responding to Messages
After processing the incoming webhook, send a reply using the Chatmaid send endpoint:
javascript
async function sendReply(to, fromPhoneId, content) { const response = await fetch('https://developers-api.chatmaid.net/v1/messages/send', { method: 'POST', headers: { 'Authorization': `Bearer ${process.env.CHATMAID_API_KEY}`, 'Content-Type': 'application/json' }, body: JSON.stringify({ fromPhoneId, to, content }) }); return response.json(); }
A complete receive-and-reply flow for a simple FAQ bot:
javascript
async function processMessage(payload) { if (payload.event !== 'message.received') return; const { from, content, to } = payload.data; // Simple FAQ matching (replace with AI in production) const faqs = { 'hours': 'We are open Monday–Friday, 9am–6pm EST.', 'price': 'Our pricing starts at $29/month. See chatmaid.net/pricing for details.', 'support': 'Email us at support@chatmaid.net or reply here anytime.' }; const keyword = Object.keys(faqs).find(k => content.toLowerCase().includes(k) ); const reply = keyword ? faqs[keyword] : "Thanks for your message! We'll get back to you shortly."; await sendReply(from, to, reply); }
Webhook Reliability
Chatmaid retries failed webhook deliveries with exponential backoff:
- First retry: 10 seconds after failure
- Second retry: 30 seconds
- Third retry: 2 minutes
- Fourth retry: 10 minutes
- Fifth retry: 1 hour
A delivery is considered failed if your endpoint returns a non-2xx status or doesn't respond within 5 seconds. This is why the examples above respond with 200 OK immediately and then process the message asynchronously — to avoid timeouts on long-running operations like AI calls.
Failed deliveries are logged in the Chatmaid dashboard and can be manually replayed.
Using Webhooks in n8n
If you're using n8n, the webhook handling is built into the Webhook trigger node. Set the method to POST, copy the webhook URL, and paste it into Chatmaid. n8n handles the HTTP layer; you focus on the workflow logic.
Note: n8n doesn't natively verify HMAC signatures in the Webhook node. For production, add a Function node after the trigger to verify the X-Chatmaid-Signature header before processing.
Local Development Without ngrok
If you prefer not to use ngrok, Chatmaid's sandbox environment (sk_test_*) can fire simulated webhooks to a localhost URL if you configure it with a tool like Hookdeck or the Cloudflare Quick Tunnel (cloudflared tunnel --url http://localhost:3000).
Alternatively, the Chatmaid dashboard includes a Test Webhook button that fires a sample payload to your registered URL — useful for testing your endpoint structure without needing a real incoming message.
Common Patterns
Pattern A — Simple autoresponder: Reply with a fixed message or menu whenever anyone sends you a WhatsApp. Good for basic business accounts.
Pattern B — AI chatbot: Pass the incoming message to Claude or GPT-4o and reply with the AI's response. This is the foundation for 24/7 customer service.
Pattern C — Keyword routing: Check the message for keywords and route to different handlers. "HELP" → FAQ, "AGENT" → escalation, "ORDER #" → order lookup.
Pattern D — Lead capture: Log every new sender to a CRM, send a welcome message, and notify your sales team via Slack.
Pattern E — Command interface: Build an internal tool where team members send commands via WhatsApp ("RESTART staging", "DEPLOY main") and the webhook triggers the corresponding action.